

Here is a picture of the Mod Podge drying.

The next day, I started the grouting process. I made a mixture of fast drying spackle, craft paint, some craft glue and a little water. I worked the mixture into each of the crevices with some clay working tools and wiped off the excess.
I had used this process in the past with some thick paper brick and it wiped off the brick pretty easily, however, the textured stone on this project was more textured and it didn't really wipe off. I started with Kleenex, them moved to paper towels, then wet paper towels, (which started to become one with the stone) so I switched to damp rags. To be honest I was starting to worry. Luckily the walls are covered in vinyl flooring.
I also used painters tape to tape off the roof as I worked my way around the top of the chimney.
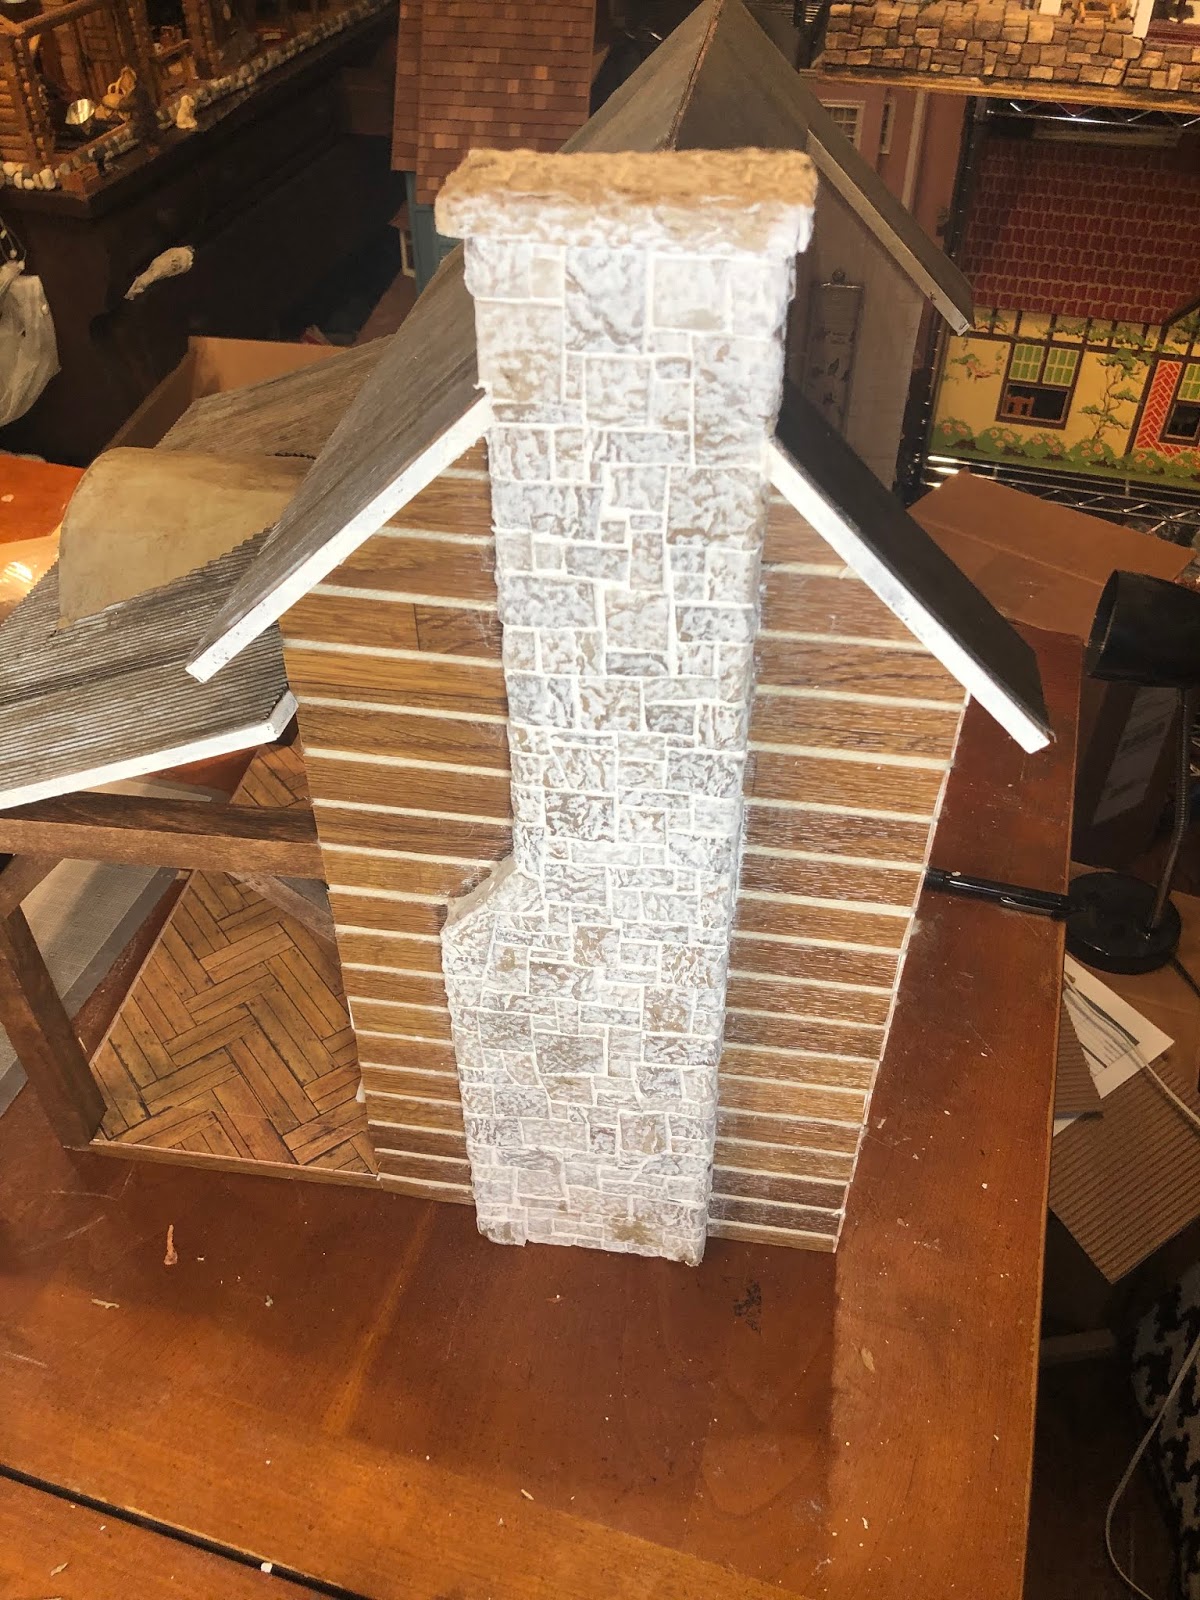
So here is what I ended up with. You can see that some of the stones were starting to become mush (towards the bottom). I figured that I would just let it dry and see what happens.

The next day - the grout looks good, I was modeling the stonework after the inspiration photos below (from Pinterest) I was thinking that It just looks like the stone was white- washed, so I decided to touch up the stonework with some paint.

I used light washes of craft paint in browns and grays to try and match the photos. It turned out pretty great!

I decided to drill holes for the chimney pots rather than just glue them on top. I may or may not have started singing Chim-Chimney-Chim-Chim-Cher-ee at this point - wondering how Bert would clean this fireplace?

I decided to go with small wooden spools for the chimney pots. I drilled the holes larger and painted them a metallic color, then tamed that down with some brown washes - the same technique that I used on the roof.

Here is the bird's eye view

And here it is all finished!
I love how it looks. I ran into that same problem with my 'mortar' after a while the sealant on the stone wears off with all the wiping. I'm wondering if I do two layers of sealant if it will help or not.
ReplyDeleteI usually end up sealing everything after I've got the look finalized.
Preciosa chimenea , el resultado ha sido genial:-)
ReplyDeleteIt turned out wonderfully, Troy! I have had issues with the Mod Podge coming up while wiping the grout, too. I found using Golden Glazing Medium in gloss sealed the paper fiber better and the grout came right off. Afterwords, to knock down the gloss look, you can seal the entire thing with matte Mod Podge or whatever sealer you like. It's an extra step, but it makes your heart palpitate less! I'm glad you got such great results!!!
ReplyDeleteAs usual, Troy, you worked your miracles! Looks great!
ReplyDeleteUna chimenea fantástica,me encanta el resultado!!!!
ReplyDeleteBesos.
Hello Troy,
ReplyDeleteIt look terrific. the chimney pots are great, but the stone work 9is what most impresses me. It is so well done. Bravo!
Big hug
Giac
Hi, Troy - The chimney looks fabulous! I'm glad that the grout turned out so well; I always think that's such a scary job. The stone texture and the colors are perfect; your chimney actually looks better than your inspiration photo! Nice work.
ReplyDeleteMarjorie
Hi Tony! The chimney looks awesome! The graphic punch of the rectangles against the horizontal cabin logs is perfect! I'm glad your grout worked after all!
ReplyDeleteIt looks EXCELLENT Troy!!! You have produced a Believable stone chimney which Bert would be Proud to clean; that is-
ReplyDeleteshould you ever need him too! ;D
Hi there! I came across your blog in search of a place to purchase miniatures in Tulsa for a school project. We've been to Hobby Lobby, but they're selection is very limited. The project is due Tuesday so I don't have time to order anything. Do you have any recommendations?
ReplyDeleteSadly, Hobby Lobby is about the only place with miniatures locally. I have a ton of inventory, what are you looking for specifically?
DeleteHi Troy!
DeleteJust following up to see if you saw my response? We are finishing up the project this afternoon. :)
We are making a diorama of Thomas Edison. Would love to find a mini globe table lamp similar to this - https://manhattandollhouse.com/shop/dollhouse-table-lamps-led-battery-operated-c-4_71/clear-globe-table-lamp-t6-04-clear-p-1101?zenid=npb561e0sr087f866suqln6ac2
ReplyDeleteWould also love to find a better person to look like Thomas Edison and maybe a bookshelf, movie camera, phonograph, etc.
Thank you so much for your willingness to help!