My Little Corner of the Net

Tuesday, August 30, 2016

A Few "New" Things & A Little More Progress

I was able to get a few more rocks glued on the cabin bedroom fireplace this week.
The area under the fireplace holds the power strip for the lights.   I am going to stack some chopped firewood on the flat area next to the fireplace.

Here is a view of the inside of the fireplace


I found these vintage rugs at an estate sale last week. I think they are wool.  Most items at the sale were from the 1950's -1960's so I assume these were too - Maybe from Mexico?


 I came across this set of brass miniatures at a flea market 

 I found these small "gold" frames at another estate sale.  
I thought they might look good in my Victorian house.


I have had this display case for a few years.  It was housing some extra Tootsie miniatures that I have.  I decided to keep some of the accessories in it until I decide which house to use them in!


Saturday, August 27, 2016

Rock On

I finished installing the rocks on the front porch and started putting them around the base of the cabin.  The purpose is two-fold:  To hide the base and to raise the cabin up a little and it looks cool!


I had built a 1" tall frame when I built the cabin.  The kit originally came with a sheet of wood paneling for a base, but I needed something more substantial.  I have also run much of the electrical wires in the base.  I re-posted some sketches from an older post showing how I altered the kit.


I have since added a small bathroom to the up stairs bedroom.
Click HERE for that post.


 The next project is the fireplace on the other side of the cabin.  This room was originally supposed to be the kitchen, but I am using it for the master bedroom.


This room is smaller so the I am going to make the fireplace smaller too.
I love the knots in the pine floor.


Here is an old sketch from a previous post showing my plans for the light fixture.  I have decided not to run the rocks up past the mantel in the bedroom.


This was the original fireplace template that I cut from cardboard, but it still feels too big for the space.  I will try some others until I get the right scale.

Tuesday, August 23, 2016

Cozy Cabin Front Porch

I made some headway on the front porch this evening. I am using Paperclay to create the stone porch.  I rolled the Paperclay into sections that were about 1/8" thick.  I had designed the wood frame for the porch and screwed and glued it to the base of the cabin.
Initially I was going to use wood for the porch floor, but then decided that stone would look better.  I infilled the center of the porch sections with foam.  It is both lightweight and created a surface that I could glue to.  Another reason I am using Paperclay instead of real rocks is because it is very lightweight.  I had used real stone on a house previously and it weighed a ton!


I coated the porch with craft glue and laid the clay over it.  I smoothed it out and then 'drew' a stone pattern with my clay tools.  Then I worked each stone to try and make it look unique and stone-like.


Here is the corner column with the stones attached.  While the clay was still moist, I worked & shaped it into the original angled design.


Here was some more progress on the floor and one of the other corner porch supports.

Just one more column to go, then I will continue with the stone base around the rest of the cabin. I have decided that I will hold off painting the rocks until after I get  all of the stone installed.

Saturday, August 20, 2016

Cozy Cabin Fireplace Update

I have been making lots of "rocks" this week for the cabin fireplace.  I have been using Paperclay to create the stone.  After some more 'trial and error'  I figured out that the most successful method was to make the rocks individually then glue them to the fireplace when they are close to being dry.


I added another small section of roof to the living room.  I ended up using some paint stir sticks for the structure from the local big box store.  I had been holding off on the roof and shingles around the fireplace until I figured out how I was going to create the stone. I wasn't sure if I should build the roof around the fireplace or install rocks around the roof.


After the roof piece was in place, I finished shingling the roof on both ends of the cabin.  


I decided to create a stone top for the chimney out of the clay also.  Now I get to select some paint colors for the stone.


Here is the view of the chimney from the living room side of the cabin


Here is the view looking over the front porch.

Here is a birds eye view from above.


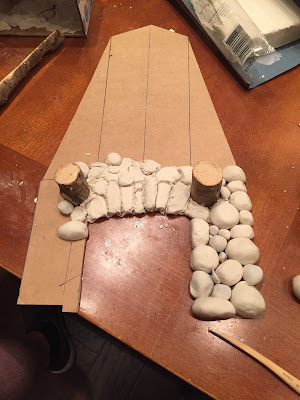
The other project that I started was the stone work at the front door.  
I used some cardboard to build a base for the stone column surrounds. 


I toyed with the idea of creating four stone tapered pieces -but decided on three. 
Four didn't leave a lot of room for furniture.  I may build some sort of trellis over the front porch to tie the elements together. The porch floor and the three pieces will be covered with stone.  I am also going to put stone around the entire base of the cabin.

Click on the cabin label below to see the progress on this project.


Saturday, August 13, 2016

Cozy Cabin Fireplace Update

I haven't worked on the Cozy Cabin project in ages.  To be honest I was a little discouraged after I started the fireplace a while back.  I used some inexpensive air dry clay.  I made the rocks, glued them in place and let it dry.  Sadly, the clay shrunk by almost 50% and most of them fell off the walls.  Needles to say it has been sitting in this state for quite a while,


  Until today!

This is what it looked like at the end of today.  

Let me back up-


I started off by removing all of the cabin furniture which needed to be dusted any way.


I scraped off the old air-dry clay rocks.

This was the debris field outside the cabin.  I decided that since the clay was done shrinking, I could probably re-use some of it. 

After a little research, this was the design I came up with.  I made a template out of cardboard and a removable firebox too.

 I decided to work horizontal this time.  The two logs will support the mantle.


This is the firebox portion of the fireplace.  I started by re-using some of the old pieces and gluing them in.

This was my progress early on.  I had envisioned that I would roll our the clay and glue it on, but I was having trouble getting the river rocks to look round, so I ended up rolling the clay into different sized "rocks" in my hands and glueing them on one at a time.  I mixed in some of the rocks from the previous fireplace. After the everything drys, I will paint.

To see my earlier posts on the cabin click HERE or on the cabin label below.


Thursday, August 11, 2016

Recent Acquisitions

I found a few miniature accessories at an estate sale this week.

The plate measures about 1" across and is marked "Limoges France" on the back (see below).  The tiny piggy bank is made from wood. The tiny totem pole and monkey sculpture "speak no evil, see no evil, hear no evil"  are some kind of pewter.