My Little Corner of the Net

Wednesday, September 26, 2018

Scarlet Letter Project

My son took over the miniature studio this week for a school project.  I acted as a consultant.  He had to create a project that represented something from Nathaniel Hawthorne's Scarlet Letter.


He decided to build the door of the church.
He used some wood and glued it together , then painted it.
He also made hand forged iron strap hinges and nail heads.
The straps are painted cardboard, the nail heads are painted beads and the door knob is a key chain glued to some cardboard and painted.


He set the door on some cobble stones with moss.


Sunday, September 23, 2018

Miniature French Prints

I came across these signed miniature French prints at an estate sale a while back.
I had taken a miniature glass class earlier this year, so I was up for the challenge of replacing the glass.


The prints are both the same size and measure just 2-1/4" across.

This one has the a major crack in the glass while the other just had a chip on one edge

Both prints have this sticker on the back and as you can see from the photo, the glass, the mat board border, the print and back piece are held in place with a small metal clip

I measured the glass and cut.  I wont lie, I had to cut more than 2.  Glass can be a little tricky.

Here are both prints with a new clean piece of glass, ready for hanging.

Sunday, September 16, 2018

Copper Shop Window Shade

Notice anything different about the copper shop? The copper shop has a proper window in place now with a window shade.

The window I used for the copper shop room box was one that I found at a garage sale many years ago and did not contain any "glass"

This weekend, I added a thin piece of acrylic and some wood mullions to the interior.  Initially, I was going to do individual pieces of glass, but then I  decided to do one large piece and attache a wood grid to the back.

After I cut and sanded all of the pieces of wood, I stained all of the surfaces.

Here is the window and grid glued in place.

I constructed a cover out of wood that will house the roller shade.

 I am still working on the placement of the items in the shop (below)


 I have picked up a few discontinued fabric sample books here and there


I selected one that was cream colored with copper pin stripes and cut off the zigzag edges


Once I had the fabric cut to the correct width, I glued it to a wooden tooth pick
While that was drying, I applied some glue to the wooden box and applied fabric over it.

Here is the finished window treatment box

 Here is the shade and the box.  Note that I left the paper backing on fabric and the zigzag edge on one side.

 I attached a small copper colored chain in place with hot glue, then added the rolled up fabric shade.  The shade is non-functional, but I wanted it to look real from all angles, including looking into the shop from the outside.

 Here is a view of the shade attached in place

I also decided to glue some of the accessories in place, some copper measuring cups and kitchen utensils.  I also mounted a copper framed mosaic piece of art that was an estate sale find.
To see more posts about our Tulsa Miniature Club room box project, click the Copper Shop label below. 

Thursday, September 13, 2018

Recent Acquisitions

I have not posted about my recent acquisitions in a while.  I have come across a few great finds.  One of the things I enjoy about miniatures is finding items and doing research to figure out what it is and where it came from.  This week I learned that American Girl created and sold 1" scale room boxes back in 2000.  I came across a few at an estate sale.  They are electrified with working lights and are pretty detailed.  

This is the roof top garden.  The lights hanging on the wood trellis work.  The floor is reversible brick or stone. The seat cushions are reversible too - flowers or stripes?

This room is called the Bubble bedroom set.  After doing some research, I learned how each room set worked.  You purchased a blank white box and them room sets and items were sold separately.  The wallpaper, pictures, ceiling trim, baseboard trim and windows etc. are all magnetic. The wallpaper is also reversible so you can change it and move things around.  There are several outlets around the room to plug in the working lamps.  After looking at them, I think I will put the bubble bed in the room below and the purple bed in the room above.

This room's desk and chair and night stand are from the squiggly set and the bed is called the purple bedroom set.  The room boxes each come with a storage drawer and can stack or sit side by side.  I have them all stacked in my studio right now.  Here is a link to a website about them. AG Minis Site They are not produced anymore, but there are several items on Ebay.


I came across these oak  vintage Victorian looking pieces at a garage sale.  They are 1" scale.  I may experiment with the finishes when I find a place for them.


These little frames are from an estate sale.  Not sure who the people are?


I came across this wooden Eames bentwood chair at an estate sale.  It is produced by the Vitra Design museum.  They make miniature copies of famous furniture in 1:6 scale.  (roughly 5 inches tall and 3 inches wide) I currently have it listed on Ebay if you like it!


Monday, September 10, 2018

Copper Shop Side Yard

We learned a technique for making morning glories out of paper last month at our local miniature club meeting.  I decided to add them to my copper shop.  We are each working on a room box in the club and I decided to make mine a copper shop.


I debated on how to attach them to the building.  For now, I glued a small piece of wood.  I may add a box around it.  I came across the painted metal trellis at Hobby Lobby in the garden fairy collection in the floral department.

I drilled a couple of holes in the wood and glued the trellis in place.

We made a couple of vines of the morning glories at our monthly club meeting last month.
I also attached it to the building with a couple of bent straight pins and some glue up high.  (I may have to add some paint to the straight pins)

The flower is circle that was punch out of blue paper.  
The paper was "shaped" with a stylist over the piece of foam to the right.

After the bloom was shaped, I added a little dark blue eye shadow and a drop of yellow paint.

The bloom and then some leaves were glued with craft glue to floral wire.

I weaved the wire through the trellis to hold it in place then strategically added a few drops of craft glue at the base and on the trellis.

We had worked on some other paper flowers that were punched from colored paper in a previous class and so I added those to the mix.  They consist of a paper bloom attached to a piece of floral wire with craft glue.

Here is a photo of the my stopping point.  
If you look close, you can see a couple of paper punched butterflies too!


Tuesday, September 4, 2018

TynieToy Nursery Update

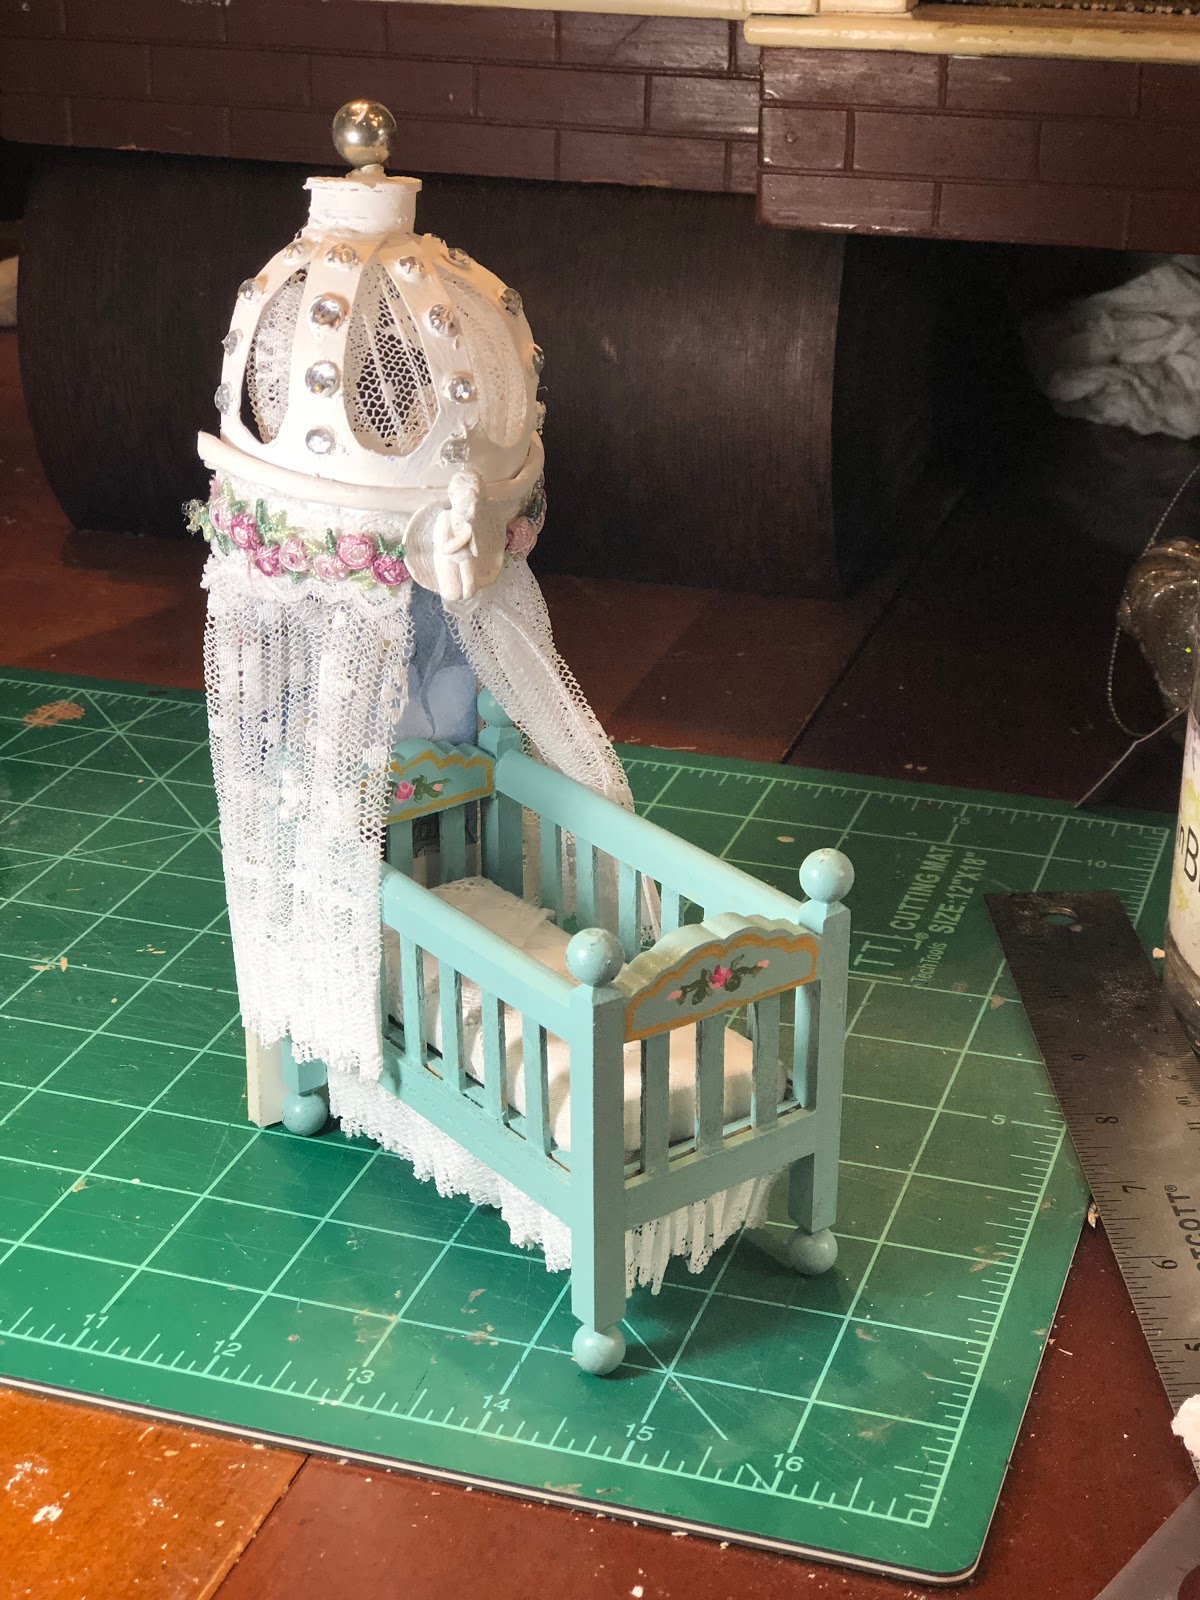
I added some bedding and experimented with adding a canopy to the nursery crib.  I wanted to keep a 1920's - 1930's era feel for all of the items in this house


I'm not totally happy with the outcome, but it will do for now.


 I used some layers of foam core for the bed mattress and the support the bed skirt.


I found some pleated lace and used hot glue to attach the lace to the skirt

 
Here is a photo of the skirt attached to the crib


I like to look for antique handkerchiefs and doilies at estate sales to use on projects just like this.  I may use part of it to make a scarf for the dresser and fireplace as well.

I used a corner of this handkerchief for the bedding.  I was pretty happy with the result


I looked all around town for a crown to use for a canopy.  The closest thing I found was a Christmas ornament, which was too large. 

 
I ended up using a paper cup.  I cut away the top and part of the sides.

I used hot glue to hold it in place and added some textural elements, beads, a small plastic cherub, a bottle cap, and a small Christmas ornament.  I may need to scale down the beads..

I painted it white.  I decided to attach it a tall piece of cardboard instead of hanging it on the wall or ceiling.  I also found a stork image to use as a small mural.


I also found some ribbon that reminded me of the flowers on TynieToy and incorporated that.


I have been looking for artwork for the nursery walls.  
These are the pieces that I have found so far.  The frames are from the scrapbook section of the local hobby store.


The tall poster is contains several Mother Goose images, "a cow jumping over the moon," "the dish that ran away with the spoon," and "the cat and the fiddle."  The square image is from "Rock A Bye Baby on the tree top" and the oval image is a stork delivering a baby.

Nothing set in stone yet, but a little progress.