My Little Corner of the Net

Showing posts with label Shabby Chic. Show all posts

Thursday, May 23, 2019

Shabby Chic Hydrangea Planter Box

Our local miniature club worked on a hydrangea planter box last month.


A thank you to Carolyn who put together the kits which included all of the pre-cut pieces that we needed to build the wooden box, some soil, florist foam and the pieces to build the flowers.  She also included a small picture of the finished product to aid in construction.


The first step was to glue together and paint the wooden box.  Here is mine held in place with a rubber band while the glue dried.

After the box was glued together, we glued in a piece of florist's foam.  In anticipation of putting my project in my Shabby Chic Cabin project (another Tulsa Miniature Club project) I painted my wooden box white to match the rest of my cabin.


Here is glue applied to the foam to hold the  "soil" in place.  


While the glue was drying under the soil, I started constructing the hydrangeas.  These were assembled by gluing a small inexpensive "Mardi-Gras" type bead to a piece of wire.

The petals of the flower were tiny pieces of tissue paper that had been punched out using a flower shape.  Using a stylus tool, we shaped them into a more realistic looking bloom, by pressing the paper into a piece of foam and curling the edges up.

The bloom was then dipped in some craft glue and applied to the bead.  I inserted the wire/bead base into the foam before I started gluing the petals on.

I added some small pieces of plastic greenery to the wire and then added some green tissue that was also punched out of a flower pattern and molded with a stylus tool.


click HERE to see more posts about my shabby chic cabin project


Sunday, March 3, 2019

Shabby Chic Cabin Update

I have made a few updates to the Shabby Chick Cabin so I thought that I would bring everyone up to speed.
 

When I left off at the sink, I was at a point where I needed drawer pulls.  I had some heavy duty foil left over from a knife making project at the Tulsa Miniature Club.  I titled the picture "foiled again" because they were just not looking to great.


I opted for a my stand by, and ordered a faucet and drawer pulls online from Miniatures.com.


Here is a picture of the sink all glued together with all of the drawer and door pulls installed and the faucet in place.


Here is a picture of the cabinet in it's place in the cabin.

I added a few accessories to see how it looked.  The rough hewn ladder came with the cabin kit.  I added a little white-wash.  The side table with the antique coffee grinder is a vintage piece (circa 1950's) by a company called Toncoss.


Here is a photo of the loft.  The majority of the space is taken up by a big brass bed ( a local estate sale find) all decked out in comfy white linen.

 I envisioned  the corner space of the loft as a place where the owner of this she-shed likes to escape and work on crafts including sewing.


Here are some views of the lower level


I chose a family picture from my daughter's wedding this summer over the fireplace.


Here is a view of the front porch.


I may add a ceiling fan to the porch and maybe some curtains to the windows.

Thursday, February 21, 2019

Shabby Chic Cabin Chimney Update

I think that I have finished the chimney on the Shabby Chic Cabin project.  I'm very pleased with the way it turned out.  You may recall that I made the "stones" from textured recycled packing cartons, it is similar to egg cartons but more textured.


 After all of the stonework was complete, I painted each of the stones with craft paint.  I did receive advice that it was important to seal the work.  I understand why because the material starts to get a little mushy when it gets wet.  I ended up sealing with Mod Podge.  (I used mat finish)

Here is a picture of the Mod Podge drying.

The next day, I started the grouting process.  I made a mixture of fast drying spackle, craft paint, some craft glue and a little water.  I worked the mixture into each of the crevices with some clay working tools and wiped off the excess. 
I had used this process in the past with some thick paper brick and it wiped off the brick pretty easily, however, the textured stone on this project was more textured and it didn't really wipe off.  I started with Kleenex, them moved to paper towels, then wet paper towels, (which started to become one with the stone) so I switched to damp rags.  To be honest I was starting to worry.  Luckily the walls are covered in vinyl flooring.  
I also used painters tape to tape off the roof as I worked my way around the top of the chimney.

So here is what I ended up with.  You can see that some of the stones were starting to become mush (towards the bottom).  I figured that I would just let it dry and see what happens.

The next day - the grout looks good, I was modeling the stonework after the inspiration photos below (from Pinterest) I was thinking that It just looks like the stone was white- washed, so I decided to touch up the stonework with some paint.


I used light washes of craft paint in browns and grays to try and match the photos.  It turned out pretty great!

I decided to drill holes for the chimney pots rather than just glue them on top.  I may or may not have started singing Chim-Chimney-Chim-Chim-Cher-ee at this point - wondering how Bert would clean this fireplace?

I decided to go with small wooden spools for the chimney pots.  I drilled the holes larger and painted them a metallic color, then tamed that down with some brown washes - the same technique that I used on the roof.

Here is the bird's eye view

And here it is all finished!  

Wednesday, February 13, 2019

Shabby Chic Cabin Furniture

I have been working on some furniture for the Shabby Chic Cabin project.
This vintage wing chair was a gift from a niece a while back - she knows I collect miniatures and picked it up at an antique mall a  while back.


The first step was to remove the cushions.

I then painted bright red mahogany color a glossy brown that I have been using on other parts of the cabin project.  Once that was dry, I coated with the crackle finish and finished up with the warm white paint that is also part of the color palette for the cabin.

Here are the front and back views with the cushions reinstalled.


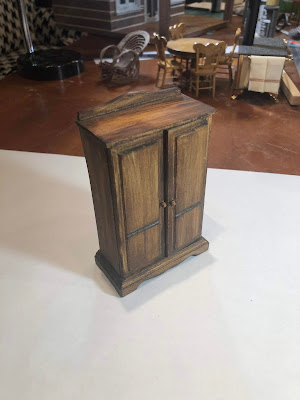
The next project is a wardrobe for the loft bedroom.  I decided to do the crackle finish over the existing brown stain.

 I am going to line the wardrobe with some small print craft paper 
(as soon as I find the right one!)


Up next were these Victorian style kitchen chairs.  I have had these in my collection for over 30 years.  I had envisioned them in a Victorian house, but the cabin project will also be a nice home.  I was never able to find a table that was the same stain color as the chairs. So win win ?

Here are the chairs coated with the crackle mixture waiting to dry.


 I think they turned out nicely!  I have them paired with the table below.  This was the table that I displayed them with and it always bothered me that the table stain was just a little darker - problem solved!  I think I will keep it stained.


Sunday, February 10, 2019

Shabby Chic Cabin Fireplace

After working on the deer head head for my Shabby Chick Cabin, I was inspired to work on it a little more.  I had started a fireplace for it, and was inspired to finish it up.


I wanted to finish the cabin in something that was a little out of my comfort zone, with an all white palette.


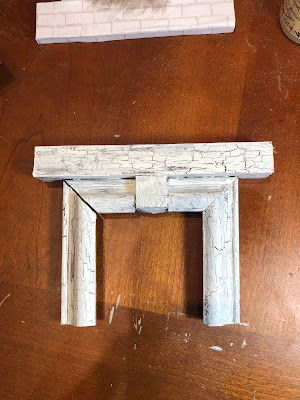
I started with a small picture frame that I picked up at an estate sale for 25 cents.   I took it apart and started by cutting off some of the 45 degree ends , but it was going to be too small.  I decided to add the wood block in the middle.  

The firebox of the fireplace was made of some scrap book paper with a white brick motif.  I attached another piece of wood to serve as the mantel and painted the whole think brown.  This was a technique that I have been using on all of the woodwork in the cabin.

The brown paint gets a coat of crackle finish medium and them some white paint.

This view shows the fireplace all assembled and ready to install.  I added a light gray wash to dirty up the back a little.

This view shows the fireplace installed.
The fire box is recessed into a chimney on the exterior. 

To see how this project started, click HERE