My Little Corner of the Net

Showing posts with label Tulsa Miniature Club. Show all posts

Sunday, November 10, 2019

Back Stage Dressing Room

I was able to install the base board and the a curtain in my retro backstage dressing room this week.
I belong to the Tulsa Miniature Club and we have all been working on individual dressing room projects and each making something to contribute to each member's room.

I also installed some old movie posters on the "outside" of my dressing room.
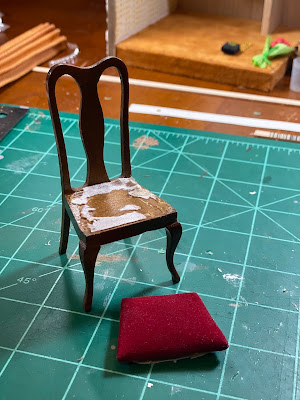
The chair was on old vintage one that I painted and reupholstered.


To see my other posts on the room click the Tulsa Miniature Club Label

Monday, October 7, 2019

Red Carpet Time - Oscar

The members of Tulsa Miniature Club are each working on a small back stage dressing room vignette.  We are each adding something for everyone.  I was asked to make a trophy or an Oscar.


Here is a behind the scenes messy photo shoot!

Tulsa is fortunate to have a Fab Lab.  A place where you can go use 3D printers and Lasers cutters, etc. for a small fee.


I was surprised that there was already several 3D computer models to choose from online.
I selected one and grouped several together.


The was the 3D printer that I used.


Yes, that says 3 hours and 3 minutes to print 14 Oscars!


Here is a photo of the finished product.  The material is clear, so I had to hold it in the sun to get a picture.


The software added a bunch of supports that I had to cut away.


I hot glued the statues temporarily to a stick so that I could spray paint them.


Here they are all painted.  The paint was Rustoleum Shiny Brass. 


I then cut a dowel into several small pieces and hot glued them to a stick for painting.


Once the paint was dry, I glued the statues onto the base.  I found out that Gorilla Glue worked best.  Super Glue and hot glue didn't stick to the statue very well.


 Here is one of the the statues making an appearance on the red carpet.


Tuesday, August 20, 2019

Recent Acquisitions - Club Garage Sale

I have not had a lot of time to work on miniatures much lately, but I have picked up a few items here and there.  The Tulsa Miniature Club had a garage sale that we opened up regionally to the Oklahoma City and Arkansas miniature clubs.  I sold a few items, traded a few and of course purchased some. 


Items from the garage sale included the marble topped table (upper left) the pressed metal Singer sewing machine ( upper right) vintage wire shelf units, the silver candle holder with frame, and the stained oak double pedestal table.  I have purchased the Petite Princess end table, lamp and brass planter on Ebay.  I picked up the brass candle holder, and the metal boxes at estate sales.  The Chippendale chairs were on Ebay and are part of the Take-A-Seat Collection.  I found the antique cast iron Kent stove at an antique shop in Utah. 

 The stained oak double pedestal table was in pieces in a zip-lock bag and was a fun mini-project.


 To see the rest of my Willets take-a-seat collection, click HERE  The table has real marble top and is signed and dated on the bottom (1997) The chairs are resin.

The Kent cast iron stove is from the 1920's-1930's.  It has been painted a few times so I will probably strip it and restore the original colors (blue and silver)

I was intrigued by this singer sewing machine.  I have not seen a pressed metal one like it before.  If anyone has any info, I'd love to hear from you.  I plan on putting it in my Tynietoy house in the pink bedroom.


I liked the retro look of the wire shelves and will most likely keep them with my Petite Princess collection. The table, lamp, basket and planter are Petite Princess.  You can read more about Petite Princess Fantasy Furniture in my latest article in Dollhouse Miniatures.

Lastly, I came across this leather Moroccan wallet at an estate sale.  It is similar to the Moroccan book cover that I found not too long ago.  I think that I will use it as a rug with my green bedroom furniture in my Philco Radio House.

Please be sure to follow me on Instagram ~ tulsaarchitect

Thursday, May 23, 2019

Shabby Chic Hydrangea Planter Box

Our local miniature club worked on a hydrangea planter box last month.


A thank you to Carolyn who put together the kits which included all of the pre-cut pieces that we needed to build the wooden box, some soil, florist foam and the pieces to build the flowers.  She also included a small picture of the finished product to aid in construction.


The first step was to glue together and paint the wooden box.  Here is mine held in place with a rubber band while the glue dried.

After the box was glued together, we glued in a piece of florist's foam.  In anticipation of putting my project in my Shabby Chic Cabin project (another Tulsa Miniature Club project) I painted my wooden box white to match the rest of my cabin.


Here is glue applied to the foam to hold the  "soil" in place.  


While the glue was drying under the soil, I started constructing the hydrangeas.  These were assembled by gluing a small inexpensive "Mardi-Gras" type bead to a piece of wire.

The petals of the flower were tiny pieces of tissue paper that had been punched out using a flower shape.  Using a stylus tool, we shaped them into a more realistic looking bloom, by pressing the paper into a piece of foam and curling the edges up.

The bloom was then dipped in some craft glue and applied to the bead.  I inserted the wire/bead base into the foam before I started gluing the petals on.

I added some small pieces of plastic greenery to the wire and then added some green tissue that was also punched out of a flower pattern and molded with a stylus tool.


click HERE to see more posts about my shabby chic cabin project


Thursday, February 28, 2019

Tulsa Miniature Club Project

This month at our local miniature club meeting, we put together these bird cage wall hangings.


 We started with the pieces shown below,  a laser cut bird cage, a small piece of wooden rain gutter, and some scale plastic plants.

After some light sanding, we glued the pieces together with craft glue.
I think that I will probably use mine in the Shabby Chic Cabin that I am building.

There were quite a few varieties, here are some of the different class members' projects.

 Each participant had a different take on how to arrange the greenery.


Friday, October 26, 2018

Copper Shop Light fixture

Our club project this month was a light fixture for our room boxes.  


This is my first light fixture and I debated on whether or not to electrify it.  
I decided not to. But I did add a second tier and went a little more elaborate than the rest of the group.


 The main structure for the fixture is cloth covered floral wire.  I twisted it together and also used hot glue and some paint.


I found all kinds of jewelry fittings mainly from Hobby Lobby.  The candle stick portion are actually silver colored beads that I painted the same cream color as my ceiling.  The piece on top is a small grommet.

I ended up topping the candle stick with a bronze colored grommet and a small plastic button to help hold the lamp shades up a bit off of the candle portion.


The lamp shades are also copper/bronze colored metal beads from the craft store.
I had extra chain left over from the window shade so a glued some of that on there too!