My Little Corner of the Net

Thursday, August 30, 2018

Copper Shop Gutters & Downspouts

I have been working on the exterior of my copper shop.  I decided to add a "copper" rain gutter and downspout.  I also added some wood trim to finish off the edges.  Here is a view of the downspout in place.


 I have been collecting plastic drinking straws over the past few weeks trying to find just the right size.  I was looking for one that was larger to use for the gutter and one that was flexible for the downspout.
I ended up using the teal ones for the downspout and the large milkshake straw in the white wrapper for the gutter.

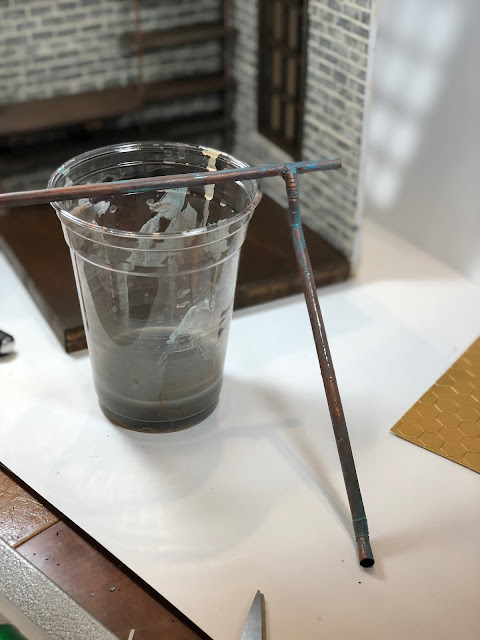
Here was a trial fit of the downspout.  Once I had the right shape, I used super glue to attach them together.

While the glue was drying I bent some sturdy wire to use as the supports.  

I drilled holes in the end of the roof fascia to hold the supports.  I used a hole punch to cut a hole in the gutter for the downspout, then trimmed it to fit and used super glue to hold it all together.

Once the glue was dry, I painted it dark brown.  The red and teal were still showing through so I added another coat.  Once that was dry, I added copper colored paint.

This is a view after I added some age and patina.


While I was waiting for the paint to dry and since I had all the shelves empty, I added some metallic copper looking vinyl wall covering to the ceiling of the dormer.

I liked the texture of the wallpaper sample and it reminded me of a modern version of a punched tin ceiling.  I added some plain copper look paper to each side of the dormer because I didn't like how the angle of the roof looked with the angle of the hexagons. 


Here are a few photos of the gutter and downspout in place.   
I used a hole punch to cut out some cardboard ends for the gutter.

I like how the copper looks through the dormer.

To see the tutorial on how I made the shelves, click HERE

Wednesday, August 29, 2018

TynieToy Nursery Update

I was able to get a second coat of blue paint on the antique unfinished furniture and paint the TynieToy style accents onto each piece.  Fortunately, there are several photos of TynieToy pieces online and I have quite a few pieces of furniture so I had good reference material.  I practiced on some pieces of cardboard before I attempted to paint on the actual furniture in the TynieToy style.
Each piece of TynieToy furniture was hand painted, mostly by students of the Rhode Island School of design which was across the street from the Handicraft Club where the company started in 1920.  I was able to appreciate my TynieToy collection even more after going through this process.  


Above are some of the reference pictures that I found online.


Here was an in-progress shot of the gold pin stripes (no flowers yet)


Here are some roses and greenery added

Here is the children's chair with the children's table ( The table is an original piece from the factory)

The crib with my artwork in TynieToy style

rocking chair from the factory

The high-chair with my artwork in TynieToy style

Children's folding screen with my artwork in TynieToy style

Children's dresser with my artwork in TynieToy style.  I need to add some drawer pulls.

This was a an extra telephone table that I decided to paint to match.  I have seen these used as end tables in other scenes.

Here is a photo of the nursery items so far.  I may or may not use the yellow rush seat rocker in this room.  The rug is an original TynieToy.

I need to add some accessories, some artwork and some bedding.  These are the original colors of the house.  The curtains are original to the house as well.  I was surprised at how well they work.  The house dates from around 1920.

To see my first post about this furniture, click HERE

To see my TynieToy collection click HERE


Tuesday, August 28, 2018

A TynieToy Nursery

A baby on the way to Crescent Moon Cottage !


I have been collecting TynieToy items for the nursery in the Crescent Moon Cottage.

TynieToy was started in the 1920's and continued until the late 1940's. When the owners died in 1940 and 1947 the remaining inventory and attic stock was sold. The unsold items, in varying states of production from finished to unfinished were put away in storage. These were then sold at auction in the 1980s, and were purchased by the owners of a museum in California where they remained in boxes unit recently when they were put up for sale and are now available.


I have purchased a few of the unfinished nursery items.


I have also purchased a few finished nursery pieces. 
The rocker and child's table show below.


This week I have been  painting the unfinished pieces to match the finished ones.  I brought a finished piece to the paint store and had it color matched.


More to come!

To see my other TynieToy pieces, click HERE or click on the TynieToy label.

To see the Crescent Moon Cottage where my TynieToy collection resides, click HERE

Thursday, August 23, 2018

Shirley Temple's Tynietoy Bungalow

While doing some research on an upcoming TynieToy article, I came across a couple of photos and articles about a dollhouse that was used in the 1935 movie "Orchids For You"  After filming was complete, the house was given to child star Shirley Temple by the movie studio 20th Century Fox.


While the house was not manufactured by The TynieToy Company, the interior two rooms were filled with TynieToy Furnishings.

In her 1988 autobiography, Child Star she wrote: "A standard stop on tours for children my age was a souvenir doll's house, now installed in our cottage bedroom. Piece by piece I demonstrated all its miniature equipment to Mary [Hayes, daughter of Helen Hayes] - the diminutive hooked rugs which lay on the parquet floors, the sheets covering each bed...Each door swung, every drawer slid open. Chintz curtains were tied back at each window, bric-a-brac cluttered the tiny tabletops, books lined the shelves...We examined everything, preoccupied with the housekeeping details, as little girls would..."


Shirley Temple was not in the movie, but worked for the studio.  I came across this picture of her showing the house to Mary Hayes, daughter of actress Helen Hayes.  

The house had a special place in the center of Shirley's Doll Room.  The house and its TynieToy furnishings recently sold at auction for $4,000.


To see my TynieToy Collection click HERE or on the TynieToy Label.


Tuesday, August 21, 2018

The Copper Kettle Company

I decided on a name: "The Copper Kettle Company"


I purchased an old soldering iron at an estate sale this week and decided to make a sign for the shop.  I was going to make it from brass and paint it black, but then I decided to try this copper wire instead - after all, its a copper shop right?


I have to admit, its pretty rough, but 'decent' for my first attempt with a soldering iron. I may try again with the brass instead of copper. I may be able to grind down some of the solder with my dremel? I found a design that I liked, sketched it out in AutoCAD and printed it out to scale.


Sunday, August 19, 2018

The Copper Shop - Shelf Tutorial

The copper shop project is taking shape.  I went back and forth about what kind of furniture or shelves to use and came up with this.  


Here is a photo from online that was my inspiration.  The real version is available in England, made from used scaffolding and retails for just over $3,000.


I like the industrial 'Steam Punk' kind of look of these and decided to create something similar in miniature.  
  

For the wood shelves I used paint stir sticks from the local home improvement store.  They are free and just required a little sanding on one side to remove the the printing. There are made of pine and a little warped, but I think that adds to the character.


The desk section needed to be wider, mainly to accommodate my vintage Durham cash register.  I cut, sanded and stained the wood.  The next step was clamping them together so that I could drill the holes for the pipe supports.


Here the stack is with two of the holes drilled.

Here are all of the wooden pieces laid out.  The bottom shelf is on the bottom, the top shelf is on the top.


I added a drawer to the underside of the desk.  These different pieces of wood show how it was constructed.  Once I was all in place, I sanded and stained it to match.


 I used two different sizes of styrene tube to create the pipes.  The later size fits nicely over the smaller size.   I was able to find this at a local hobby railroad shop.


Using a heat gun, I was able to bend the pipe into shape and let it cool.  This sounds way harder than it actually is.

I cut the fittings from the larger pipe.

I cut the pipes to desired length, counted how many fittings I would need and also hole punched some cardboard for the area where the fittings hit the wall and floor.

I Painted all of the plastic pieces with an oil based hobby paint because I didn't want to take any chances of the paint not sticking to the plastic


Here was a dry fit.  I put the unit together before I installed it in the shop.


Here is a view of the dry fit in the shop.

After glueing in, I decided that I needed to make the pipes a different color.

This shows the copper accent wash on the pipes and the built-in desk drawer.

I also modified a half round X-acto kit table by adding a bottom shelf to it for the display.

Here is another view.  Still working on the placement of the copper and I have some items to hang on the wall.  

Still a lot to do: windows, wall covering in the dormer, window coverings, and some exterior work.  I think that we are making a light fixture in class? 

To see how we got started on this project and the inspiration click HERE