My Little Corner of the Net

Showing posts with label Clock Shop. Show all posts

Tuesday, June 1, 2021

Clock Shop Video

I compiled the progress photos of the clock shop and put them into a short video.

I found the antique Russian clock case at an estate sale and thought it would make a great room box. I also learned a lot about clocks in the process!  Let me know what you think.


Wednesday, May 29, 2019

Clock Shop Room Box Update

Although I never really feel like a project is finished, I feel the clock shop room box is at a point where there is not much more I can do. ( in fact I have found and added another clock since this photo was taken!)


For those of you that follow me on Instagram, you have already seen some of this. 
This photo shows the shelves and the refinished desk chair. I also painted one of the grandfather clocks black.  It was green when I found it at a sale.


I have had this chair with faded fraying fabric - I believe it is either Block House or Sonia Messer, but it is not marked.  I removed the fabric, refinished the wood and added some new lime colored seat.

As you may recall, I found the clock case at an estate sale for few bucks and couldn't resist the architectural look of it.  The clock case was missing the columns, so I decided to add some.  I went into a local clock repair shop here in Tulsa, Oklahoma, and was surprised that replacement pieces could be ordered.  I purchased a piece of paper with a marble print and ordered the metal column capitals and bases.  He also confirmed that the clock that I had was from the mid to late 1800's.


I had wooden dowels at home, so I just had to cut them in half lengthwise on my table saw as well as cut them to the proper length.

I gave the capitals and bases a coat of gold paint.


The wooden dowels are all cut to length.

I just used craft glue to adhere the paper to the wooden dowels.

If you look closely, the column bases and capitals are held in place with nails.  I also added some hot glue just to be safe and a dab of gold paint to the nail heads.


The top "pediment" of the clock was also missing a decorative scroll.  I cleaned it off as good as I could and also used some Armor All after some internet research.

I found this decorative metal piece at Hobby Lobby, its not exactly what was there, but it will work out just fine.  Here is it is before I painted it gold.


 The feet and the lion heads were taken from another antique clock, I touched up the paint of them.


A friend of mine printed out a vinyl clock face which I attached to the inside of the glass bezel. The door frame and glass were another piece that I picked up from the clock repair shop.


I used hot glue to put the glass in the frame, but didn't like the looks of the glue, so I added some clack fabric cord to the inside ( and also painted the hinge black since this photo was taken)


That pretty much brings you up to speed on this project.  It has been a lot of fun and I learned quite a bit along the way.

Friday, March 29, 2019

Clock Shop Room Box

Those of you that follow me on Instagram ( tulsaarchitect ) have already seen some of the progress on my clock shop room box.  


I have been 'toying' around with what items to place inside it.  


I picked up the mantle clock base at an estate sale for a few bucks.  I liked the architectural look of it. It is made from wood.

It also has some neat details carved into it and some interesting faux marble accents.  From what I can tell online, this type of clock was manufactured between 1850 - 1930.


The bottom is marked Russia - and has a little termite damage.

 I have picked up a few clocks here and there so I decided it would be a fun place to show them off in a clock shop.
One of the challenges of this piece is all of the miscellaneous pieces of wood that protrude into the box.  Its actually a pretty small space 4.5" D X 11" W 

I took the box partially apart.  It was put together with some really old flat head screws.
This allowed me to cut out some of the protrusions inside and give me a little more space.


I also removed the angled base trim pieces on each side to allow the opening to go clear to the floor and have some added height inside the space.  The area of raw wood is where I cut away pieces inside to allow for flush walls inside the room. I'm not sure what they stained the wood with in Russia a hundred years ago, but I ended up inhaling a bunch of it when I ran it through the table say and while sanding.

I used some sturdy cardboard for the interior walls. I initially wanted to go with an all white interior to contrast with the black exterior.  I also considered building in some recessed shelves, but there is not really enough room.

I painted the inside with bright white craft paint and added some textured scrapbook paper to the ceiling.  This was to represent an old tin ceiling.

I added a some pieces of wood on each side and at the tops to fill in the voids.
The wood baseboards and crown molding are painted and ready to be installed.


I  used some checkerboard scrap book paper for the floor and a piece of white wood trim on the edge.


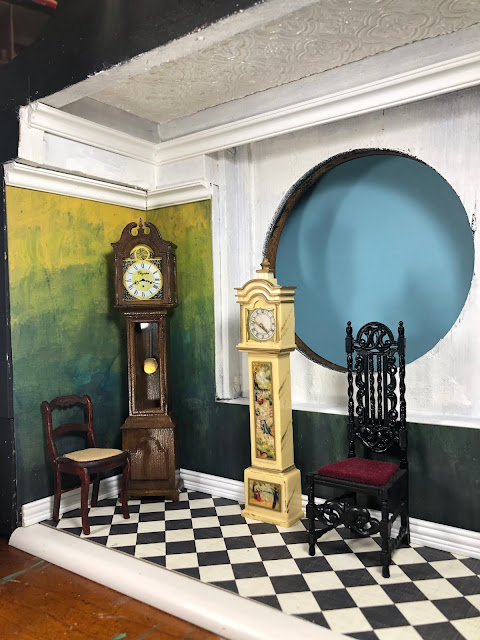
After some consideration I decided to do something a little more interesting than white walls.  I experimented with an ombre' technique using some of the colors from the faux marble on the outside of the box. 

a close-up of the faux marble trim on the outside


This was how I achieved the wall color.  I started with globs of paint, some water and kind of blended it all together.  Then dried it with my wife's hair dryer. (please don't tell her )


This was what I have ended up with so far with some furniture for scale. It's still a work in progress.  I have been contemplating  if I should light it or not, add some shine to the floor, working on the round window, and some more clocks for the display.
Stay tuned!