My Little Corner of the Net

Monday, November 30, 2015

Christmas Village 2015

We put up our Christmas village this weekend.  Each year we enjoy setting up the village as part of our holiday decorations.  Last year the village was featured in a magazine called Dollhouses Past and Present, so this year, I wanted to try something new.  


incorporated a Christmas tree into the village.


Here is the view of the living room from the entry.


Here is a close up of the tree section.


Here is an in-progress picture showing how the tree ties into the base that I typically use.
We had an extra tree and I removed four rows of branches to make room for the display.


I cut large circles out of foam core to support each section.


To see last year's village, click HERE

To see how I set up the village, click HERE


Thursday, November 26, 2015

Glitter Village Part 2

We had the opportunity to finish up our glitter house projects this week.  
We glued them to a base made of foam core and added some accessories.


To see the first post click HERE

Sunday, November 22, 2015

Glitter Houses

We had the family over today for Sunday dinner.   Before dinner, we had some fun building glitter or putz houses.  I have always been fascinated by them.


I came up with some ideas and drew them out in AutoCAD


Next I figured out a way to fit all of the pieces on 8.5" X 11" sheets of paper so that I could print them out.


I printed the design on thick card-stock and cut out the pieces.  I was kind of under a time crunch, next time I will design the buildings and cut them out on a laser cuter.  I made a kit of parts for each guest.


It was a great project for all ages from my youngest niece Emma age 4 ( in pink)- 
up to Grandma ( who would kill me if I posted her age) 


More pictures later after we finish up !

Saturday, November 7, 2015

Sonia Messer Repairs


The replacement pieces are made and glued in place.  

As you may recall from my last post, this is what I started out with. 
A complete chair and an incomplete sofa.

I carefully removed the arms, supports and  one of the carved ball and claw legs from the chair so that I could reproduce them.  This was my first experience making molds and creating resin pieces and I have to admit, it was fun.  I have posted a few pictures of the progress below.


This was my first attempt at making two piece molds - there are several helpful videos online that you should watch before you attempt.


I will confess, it took several tries to figure out what I was doing.  The first 4 arms did not work out and the first two of the five ball and claw feet that I made did not turn out.  You can see the leg at bottom right (above) Air in the mold caused the ball and claw not to form where the chair leg got skinny.  I figured out a work-around, I filled this part of the mold first, then put the two pieces of the mold together and filled it the rest of the way up with the resin.

Here are the finished pieces of resin, cleaned up and sanded and ready for paint and stain and a clear coat.

Here you can see the chair re-assembled and the sofa with its new arms and legs.
If anyone needs any molds for Sonia Messer legs and arms, I know where you can get find some real cheap!

To see part one of my this post click HERE

Thursday, November 5, 2015

Sonia Messer Imports & The New Project

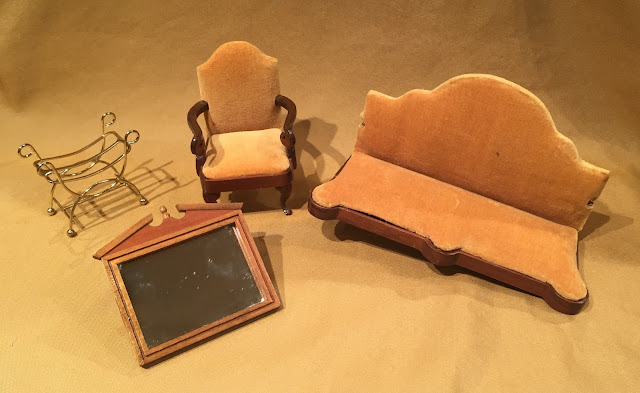
I came across these 4 pieces at an estate sale.  The mirror is in great condition and is labeled Shackman on the back.  The brass bench reminded me of the house I built with my daughter several years ago and thought it might work in the bathroom there. All that it needs is a padded cushion.   To see Carolyn's Place click HERE.


The gold velvet chair and sofa are Sonia Messer pieces from the 1970's.  It was part of a collection called the Queen Anne English Deluxe Living Room.  All of the pieces were carved from walnut and were manufactured in Columbia.


As you may have noticed, the sofa is missing a few pieces.  After studying the chair for a while, I realized that it had all of the pieces that I needed for the sofa.

 Both the chair and the sofa contain the original Sonia Messer Imports stickers on the bottom.  They also have the price tags.  The chair was $26 and I can't make out the one on the sofa.  Today they both retail for about $50-$75 each.

Several years ago I came across both of these Sonia Messer pieces.  The trunk and the serving tray are both 1"=1'-0" scale and as with all Messer pieces, they are made from Mahogany

This photo shows the tags on the bottom of the tray and trunk


These are two other pieces of Sonia Messer furniture that I have in my collection.  
They are in the Garbe house which you can see by clicking HERE


The Project

 So I began the project.  I am carefully removing the arms and legs from the chair and I am going to reproduce them.  I have been reading up on making molds to reproduce small objects.  Once they are duplicated, I will re-assemble the chair.

A dry fit of the arm and support on the sofa were a near perfect  fit! 

These are the pieces that I removed from the chair that I will need to duplicate.  
The left and right arm and support.  I will need 3 of the carved claw foot legs, and just one of the tall back legs.


Wish me luck!