My Little Corner of the Net

Monday, November 28, 2011

How to set up a Christmas Village Part II


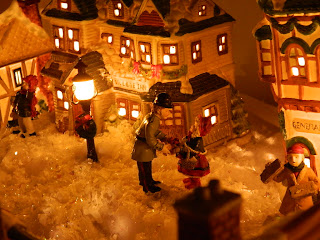
Tonight, after dance practice, dinner and homework, we finished setting up our Christmas Village.  We made some final adjustments on the 'skyline', then got out all of the accessories to make it really come to life.  People, pets, trees, fences, signs, benches, and even deer all around the city.

If you missed my previous post, click here: 

 http://tulsatinystuff.blogspot.com/2011/11/how-to-set-up-christmas-village.html


The last ( and most fun part) is sprinkling on the snowflakes.  We used large 3 bags this year.  I like the kind that is ground up plastic shavings and a mixture of iridescent glitter.  It looks great reflecting the light.  Ok, the actual last part is vacumming up whatever has fallen on the floor!


 The other thing that I really like about the village is the lights and shadows that reflect all around the room.


Click here for the link to last year's post: 


Here is how we did it at our new house:

Sunday, November 27, 2011

How to set up a Christmas Village Part I


My kids are pretty excited to help set up our Christmas village.  I am glad my son is still at an age where he likes to climb in the attic and help haul out the boxes.


My daughter was part of the assembly line too, although she was too cool to wear her Santa hat this year!

I keep each of the pieces in their original boxes for a few reasons.  One- It will be handy if we ever move again, Two- it keeps the buildings and the foam packing relatively clean and lastly, if I ever have to sell any pieces, I will have the original boxes.


The next step is taking each building out of it's box and setting aside the foam for use under the buildings.  We have marked each piece of foam with the name of the building that it goes to.  This makes putting them away much easier.


The next step is separating out the different buildings - this comes from my architectural background or my masters degree in urban planning. We try to have residential neighborhoods, a downtown area and a historic district because this particular brand of village pieces ( Mervyn's Village Square) has some older buildings from the "Dickens" era, as well as Victorian and even a few modern buildings.


Our next step is to build a sturdy base.  I have a few sheets of plywood that have been cut in half.  I keep these in the garage and drag them out for the village.  We set them on some sturdy boxes that I also keep in the attic.  I like being able to look down on the village.  It is also a good height for little kids to be able to observe.  It also gives it a more professional look than just setting it on the floor.  I think placing each building at different heights and creating hills and vistas makes the village really come to life.


This year we decided to do one giant sloping hill.  We build up the area with the foam packing from the boxes.  It doesn't have to be pretty because it will all get covered with fabric and "snow"  In previous years we have put a hill in the middle.   One of the fun things about the village is that it is different every time we put it up! 


We move the buildings around and position them and try to get them at a height that is just right.  We also try to position the buildings in some sort of logical order.  This is mostly my idea, but the kids play along !


The next task, once all of the building are placed, is placing the white fabric under the buildings.  We use the light-weight batting that is sold in hobby stores.  After it is fairly even, we poke holes in the fabric for the lights.  This takes some work moving the building off and on but it is the best way that I have found to hide all of the extension cords under the fabric.


We have some street lights that we use with our village.  These use small Christmas lights.  After having a hard time trying to get them to stand up straight the first year, We painted wooden craft sticks white and hot glued them to the base of each light pole.  The craft stick and the cord are also concealed under the fabric.  The stick can also be placed under the edge of a building or piece of foam to keep the light in place. 

That was a far as we got today.  We will work on placing the people, trees, fences, benches and giving the town a good snow storm tomorrow!

Part II can be found here:
http://tulsatinystuff.blogspot.com/2011/11/how-to-set-up-christmas-village-part-ii.html


There are some pictures of last years village at:
http://tulsatinystuff.blogspot.com/2010/01/christmas-village-2009.html


Here is how we did it at our new house:
click here

Monday, November 21, 2011

Miniatures in McDonalds Commercial

I came across the website of a company that is using 'off the shelf'  modern miniatures for a television commercial - here is a photo from the website of Element Productions.  From the looks of the doors, they are a typical dollhouse store-bought item too!


Click the link to go to their website and watch the commercial - its pretty funny:

Tuesday, November 15, 2011

Recent Acquisitions

On days when work is not too crazy, I like to go to estate sales during my lunch hour.  I am fortunate to live in an area of the country that had a lot of wealth during the 1930's - 1980's.  Recent estate sale finds include the wooden trunk and and wooden tray shown above, both have "Sonia Messer Imports" stickers on the bottom.  At another sale I came across this mini souvenir plate of the Wrigley building in Chicago - It even has a small brass plate holder.  After a little internet research, I discovered the building used to be the headquarters for the gum company by the same name.  Other finds have been this homemade hooked rug and the stately plant stand.

At another estate sale I came across this tiny handmade croquet set.  It is pretty small, just under 2 inches tall.  Even the balls are handmade, maybe from paperclay?  This would be a good miniature club or tutorial project.


I purchased this Tynietoy grand piano at an auction.  I already had the piano bench so it was destiny that they were finally able to find each other.  It needed a little work.  It was missing most of it's ornate music holder, but I was able to create a pattern and have a friend cut a new one on his jigsaw.  I also had to create the paper keyboard - I did it in autoCad.


I won this shabby chik Tynietoy bed on eBay.  It's original finish was stained wood and at some point it was painted, but it kind of looks great with the stained finish visible at the worn areas.  I think this bed will make a great "daybed" piece in the Cresent Moon Cottage attic.
My Tynietoy collection can be seen by clicking here: http://tulsatinystuff.blogspot.com/2010/01/my-tynietoy-collection.html


I was able to win this clock on eBay as well.  It belongs to the Goebel Miniature Stuart Library.  The rest of my collection and the history of the library can be seen here: http://tulsatinystuff.blogspot.com/search/label/Goebel%20Miniatures


I came across this wardrobe at a local antique store.  I have no idea on the age, it is hand carved and made from walnut and possibly cigar box parts.  It is a great 'folk art' kind of piece.  The shop owner said it came in with a bunch of things left over from an estate sale.


The doors have handmade hinges made from wire and possibly cigar box parts?  It looks like there used to be some sort of working latch mechanism.


Even the sides are nicely detailed.  It is a little larger than 1"=1'-0", but seems to display nicely with that scale of furniture.  I guess the old adage is true, one person's trash is another peron's treasure.  I keep trying to convince my wife of this, but she isn't budging!

Sunday, November 13, 2011

Hall's Lifetime Toys finds


I recently added a few pieces to my Hall's Lifetime Toy collection and decided to snap a photo or two with some different wallpaper and flooring.  I really like the lines of the living room furniture, kind of a cross between art deco meets mid-century modern.  The T.V. is totally 1970's and we had a similar one when I was a little.   I think with some cool artwork on the walls, this room will look really great.


The dining room set is all wood and has corner cabinets.  I wonder if the Hall's company was inspired by the Tynietoy company, because they seem to be a modern take on the 1920's version.


Here is the corner cabinet from my Tynietoy collection for comparison.


The canopy bed is all decked out in a harvest gold colored nubby silk fabric.  My sister had a similar yellow ruffle bedspread back in the 1970's.


I like the simple lines of the kitchen items. I also like the splatter pink and gold "Formica" looking contact paper that is on the both the counter top and the front of the fridge.  I do not know if it came from the factory this way or was added by a later owner.  Note, the chairs are exactly like the dining room ones, except painted white.


The blue bedroom furniture is also simple and sturdy.  The rocking chair looks pretty clunky compared to the other pieces.  This is the original floral bedding that came with the set back in the early 1970s.


I was fortunate enough to find a complete bathroom set, including the original furry bathroom rug.  I like the textured wood on the front of the clothes hamper, another item, that reminds of our clothes hamper growing up.


The baby nursery is all painted a flat pink color and has a decal of little lamb on both the crib and the play-pen.  This set also came with its original bedding, and a clothes hamper. 


There is a red cushioned living room set with a couch ( which I don't have yet) and a wing back chair.  There is more to the chair than meets the eye.  It actually has some pretty cool angles. 

Most of the furniture is very sturday and built from veneered plywood.

I would like to find a Hall's Lifetime Toy's dollhouse to house all these pieces, but until then, I will make due with a vintage 1970's house I have had my eye on, on eBay.  A Hall's house recently came up on eBay, but it was too pricey for me.

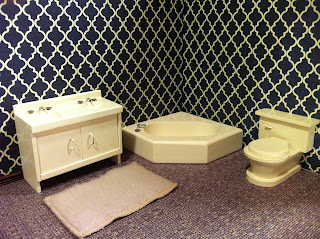
 I came across this bathroom with a double sink at an estate sale

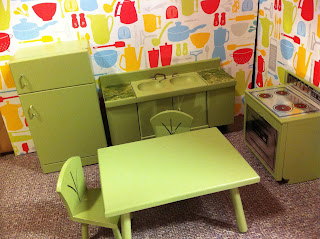
 This avocado green kitchen is in great shape.

This pink nursery set is a a duplicate that I will be selling on ebay - if you are intersted, let me know!


Thursday, November 3, 2011

A Time To Give Thanks

As we head into the Thanksgiving Season, I am reminded of some of the many things that I am thankful for.  A loving family, friends and those who have touched my life, my health, my job, pets, and of course miniatures.


This is the 'Autum Room' of the 4 seasons room box that my daughter and I made nearly 7 years ago. There are some pictures of all 4 seasons here:
 http://tulsatinystuff.blogspot.com/search/label/Seasons%20Winter%20Summer%20Fall%20Spring

I remember the candle/center piece was one of our local miniature club projects.  The plate of food was crafted by a local miniature enthusiast and given to me as a Christmas gift.  The floor was actually the floor out a dollhouse bathroom that I had started back in high school.  The towels hanging on the rack were made cut from antique dish towels and handed out at our local club meeting one day.  The table and single chair were purchased on clearance because the other chairs needed repair ( a project for another day)


I started this blog in January of 2010 and in just 2 short years it has grown to a world-wide audience of over 65 followers and over 10,000 hits.  I appreciate all of your emails and comments and ideas and inspiration that you have given me.  It is fun to see and get to know those of you that have been bitten by the miniature bug all over the world.